
How to Tunisian Crochet Across Ribbing
- kkrochets
- Jun 29, 2020
- 3 min read
Updated: Oct 18, 2021
I get asked this question quite often and am SO excited to finally be able to answer in a detailed, picture filled way!
If blogs and pictures aren't for you, no problemo! Scroll all the way to the bottom for the video tutorial! Also, This post contains affiliate links. All that means is that I get a tiny commission if you purchase something by going through one of my links at NO extra charge to you! It helps support me and is truly a win win for everyone!
RECOMMENDED HOOKS: Denise Interchangeable Crochet Hook Set
So there are two ways you can go about Tunisian crocheting across ribbing. You can 1) Tunisian crochet immediately into the ribbing or 2) single crochet into the ribbing then Tunisian crochet.
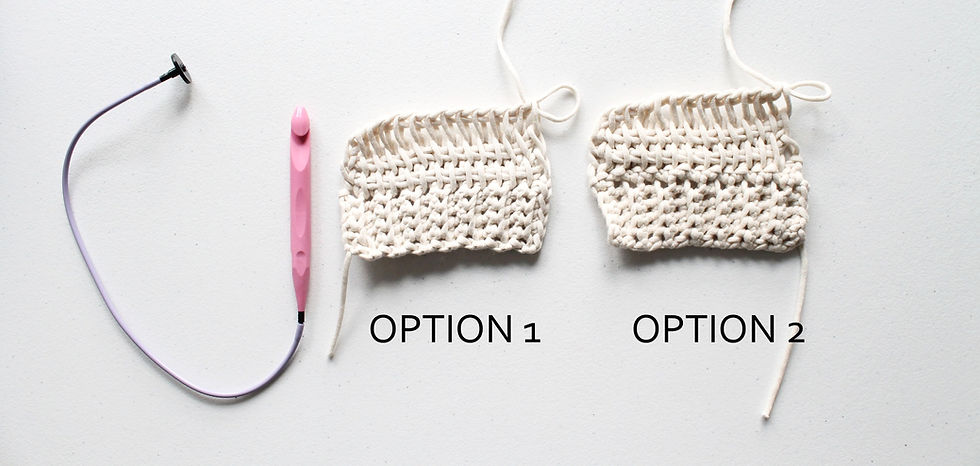
As you can see, there is a difference, as far as looks go, between the two. And although I prefer the look of option 1, I want to back up option 2 for a moment because let's be honest, we are all looking at it like it's a rotten tomato sitting next to a ripe tomato.
So I've personally found that option 2 is not that noticeable when working with thinner yarn and on a larger scale (like a garment). Plus, if you need to increase to a certain stitch count, option 2 is definitely the easier way to go about it.
Okay! Enough chit chat. Let's take a closer look.
OPTION 1 - TUNISIAN CROCHET IMMEDIATELY
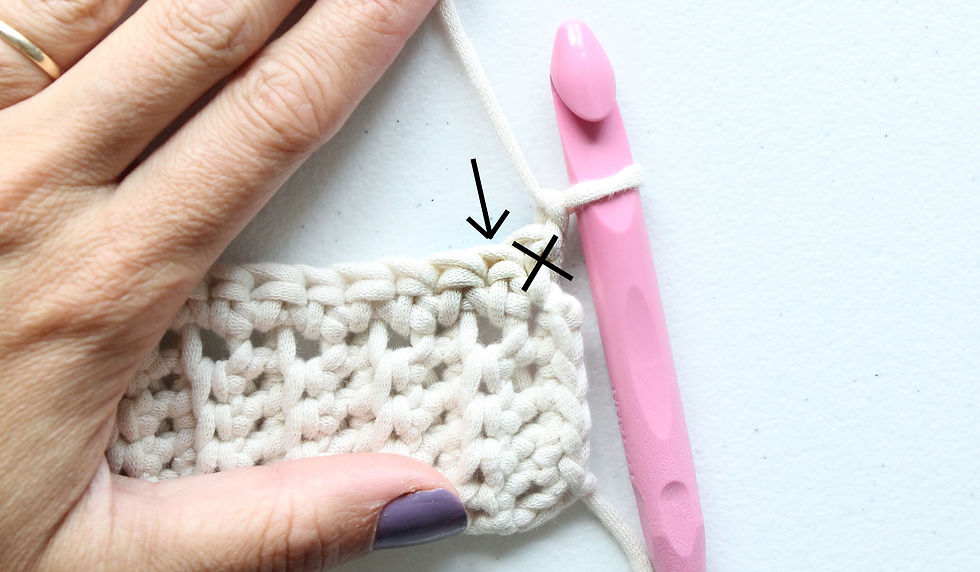
STEP 1. When you've finished crocheting the ribbing, you will need to ch 1 and turn your ribbing to prepare to work on it's side. You'll also need to switch from a regular crochet hook to a tunisian crochet hook. REMINDER: The loop on your hook COUNTS as a "stitch" so you will NOT be inserting your hook into the first "row" of ribbing but rather into the second row.

STEP 2. Stick your hook under at least 2 strands of yarn and push to the back

STEP 3. Yarn over and pull up a loop. REMINDER: Keep your tension loose!


STEP 4. Repeat steps 2 and 3 in each row across.
So much easier than you thought it was going to be, right?!
Now, if you responded "WRROOOONG!" Don't fret, Pooh Bear. I gotchu. Let's move onto option numero dos!
OPTION 2 - SINGLE CROCHET SET UP ROW
STEP 1. When you've finished crocheting the ribbing, you will need to ch 1 and turn your ribbing to prepare to work on it's side. REMINDER: The loop on your hook does NOT count as a "stitch" in regular crochet so you will need work into the first row of ribbing.

STEP 2. Stick your hook under at least 2 strands of yarn and push to the back

STEP 3. Yarn over and pull up a loop


STEP 4. Yarn over again and pull through both loops on hook


STEP 5. Repeat steps 2-4 until you reach the end of your ribbing. Then, chain 1, turn your work, and insert your tunisian crochet hook into the chain 1 loop. REMINDER: Since the loop on your hook COUNTS as your first st, you will not be working into the first stitch but rather the second one.
STEP 6. Place your hook into the next stitch (making sure to go under the top 2 strands of yarn just like you would if you were placing a single crochet)

STEP 7. Yarn over and pull up a loop


STEP 8. Repeat steps 6 and 7 until end
That's it, guys! You now know how to Tunisian crochet across ribbing! Thank you so very much for stopping by. Please, let me know in the comments if you have any questions.
Have a wonderful day and happy making, my friends ❤


Comments